Shortcuts in Menu Bar - User Guide
Welcome! Thank you for using Shortcuts in Menu Bar. This documentation guides you through setting up shortcuts, syncing across devices, and customizing the app interface.
Note: "Shortcuts" in this app has been used since 2019 to describe quick-access links and bookmarks for files, apps, and folders, so the name remains unchanged. It is completely unrelated to and unaffiliated with Apple's Shortcuts automation app.
For a quick overview, watch this short video:
System Requirements
Version 1.2.6 and later supports macOS Ventura 13.5 and later.
Version 1.2.5 and earlier supported legacy macOS releases down to macOS Sierra 10.12.
The companion iOS app requires iOS 17.6 or iPadOS 17.6 and above.
If you're on an older device, you can reach out for a compatible build. Although hardware constraints may limit what’s possible, I'll do my best to help.
Lite vs Full Edition
The Full Edition provides unlimited access to all features. In the Lite Edition, you can store up to:
- 5 Quick Notes
- 3 Menus
In order to sustain the ongoing development of the app, a small banner ad has been added to the iOS Lite version. I prioritize a seamless user experience, which means no sudden pop-ups and no app-open ads—just a discreet banner occupying a minimal portion of the screen.
User Interface & Menus
On first launch, the Preferences window appears automatically. After that, it won't pop up again unless opened manually.
Instead, the app stays quietly in your macOS menu bar—simply click the icon to open a dropdown menu displaying your organized shortcuts, notes, and Google services.
There are two types of menus: a Left-Click Menu and a Right-Click Menu. By default, the app starts with a single left-click menu (and no right-click menu configured), so clicking the icon will always display that menu. The right-click menu only becomes active once you assign specific items to it in Preferences.
- Left-Click Menus: You can create and customize multiple left-click menus to organize your shortcuts, quick notes, and links by workflow or category for quick launch.
- Right-Click Menu: While utility items (such as Preferences, Quit, or Google Products) appear in your left-click menu by default, you can move them to this secondary menu in Preferences to keep your primary menus clean and uncluttered.
- Global Hotkey: By default, pressing ⇧ + ⌘ + ' instantly opens your default menu from anywhere.
Note: From this section onward, the term "menu" refers to the left-click menu or menus in general, unless explicitly specified as "left-click" or "right-click".
Switch Between Menus
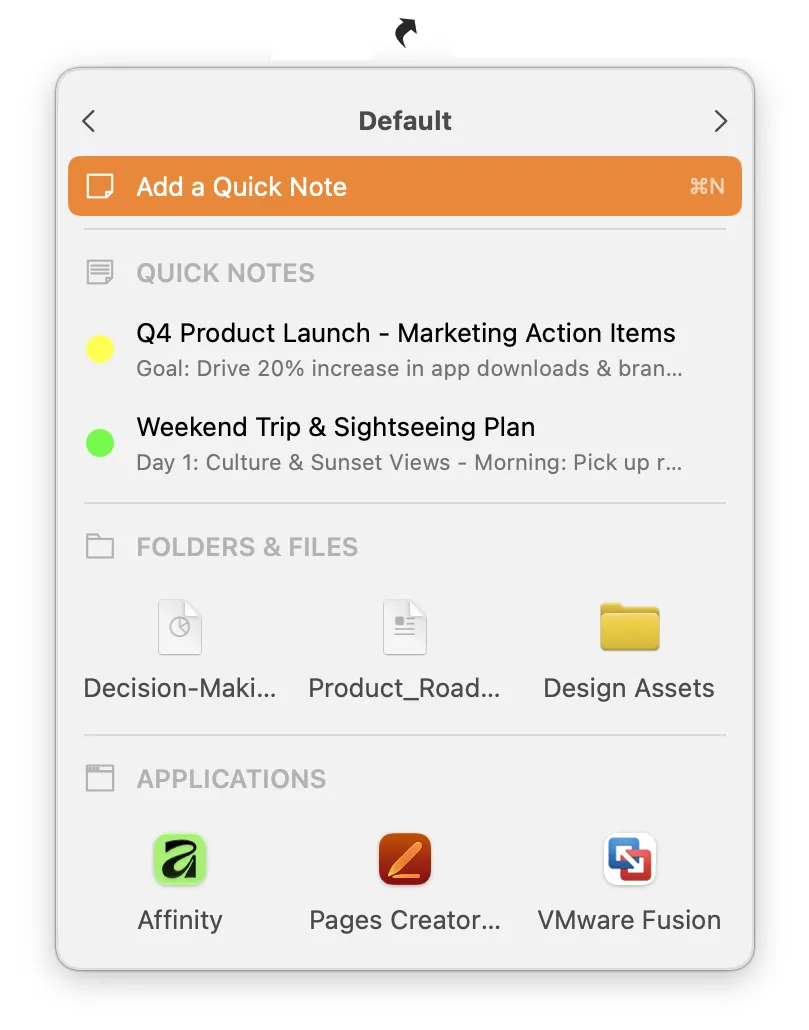
Menu with Switcher visible — Navigate using the < and > buttons
If you have multiple left-click menus, you can navigate between them using one of the following three methods:
- Display the Menu Switcher and click the < or > navigation buttons.
- Press keys 1 and 2 (where 1 corresponds to < and 2 corresponds to >), regardless of whether the Menu Switcher is visible.
- Assign a hotkey (from a to z) to a menu, then press that key to instantly open the corresponding menu without having to cycle through them one by one.
See Creating/Editing Menus for details.
General Preferences
Open the Preferences window by selecting Preferences...
By default, Preferences... is located in the default menu, and you can also choose to have it appear in any additional menu. However, if you move it to the right-click menu, it will only be available there and will be hidden from the default menu.
Under the General tab, you can customize:
- Menu Bar Icon: Choose an icon from the provided list to display in the menu bar.
- Launch at Login: Launch the app automatically when starting your Mac.
- Ask before deleting: Show a confirmation dialog before deleting an item.
- Quick Note Popover Font Size: Set the default font size for the Quick Note popover and detached window.
- Menu Font & Icon Sizes: Adjust the menu item text and icon sizes for comfortable readability.
- Show Menu Hotkey: Customize the keyboard shortcut to open the menu (default is ⇧⌘'). Click the Reset button to restore the default shortcut.
Google Products Cache
When you access Google services directly through the built-in app windows, cache and temporary web data are stored locally for fast loading.
- Est. Cache: Displays the current estimated disk space used by Google web services. Click Refresh to update this value.
- Clear: Click Clear anytime to purge cached files. Sign-in cookies and website session data remain preserved so you don't have to log in again.
- Auto-Clear When Above: Select an automatic threshold limit (e.g., 500 MB, 1 GB, or Off) to automatically clear cache when it exceeds that size.
iCloud Sync & Mobile Access
Shortcuts in Menu Bar automatically syncs your data via your personal iCloud account across Mac, iPhone, and iPad.
- Sync Scope: For websites and quick notes only. You can access, view, edit, and add links and notes on the go from your mobile devices. (Files, Folders, and Applications remain local to your Mac).
- Device Name: Enter a friendly name for your Mac under Sync preferences. Device name helps identify and resolve conflicts when changes occur simultaneously across multiple devices.
Remove Ads on iOS
Remove Ads on iOS: (Full version only) While the companion iOS app normally displays banner ads, your Full version license includes an ad-free experience at no extra cost. If ads still appear on your iOS device, simply click verify your purchase to validate your license. Once successfully verified, the iOS app will update and remove all ads. Please make sure both devices are signed into the same iCloud account (Apple sign-in required).
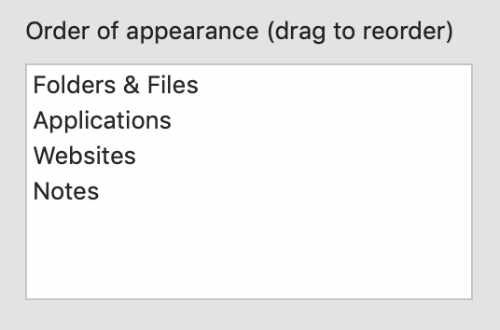
Display Order of Categories
By default, the menu displays categories in this order:
- Quick Notes
- Websites
- Folders & Files
- Applications
To change this order, go to Preferences > General, look for Order of appearance on the right pane, and drag items up or down.
Menu Layout
- Show Menu Switcher: Disabled by default. Enable this option if you prefer navigating between menus with mouse clicks. Regardless of whether this switcher is visible, the shortcut keys 1 (previous menu <) and 2 (next menu >) remain always active for fast switching.
-
Google Products Display: Choose between Submenu (default) or Inline.
- Submenu: Displays Google services inside a dedicated slide-out submenu as a traditional list. In this mode, the Google Products checkbox under Display as Grid is automatically disabled, as submenus cannot be rendered as grids.
- Inline: Embeds Google services directly below the menu header. This layout supports both list and grid views.
- Move Selected Items to Right-Click Menu: Select any item (such as Google Products, Preferences, or Quit) to relocate it exclusively to the secondary right-click context menu. Once selected, these items will strictly appear in the right-click menu—even if configured to display on left-click elsewhere—keeping your primary left-click menu clutter-free from rarely used controls.
- Display as Grid: By default, items are displayed in a standard vertical list format. Check any supported category (Websites, Folders & Files, Applications, or Google Products) to present its shortcuts as an icon grid. Note: Quick Notes does not support grid display.
- Grid Columns: Specifies the number of columns per row when displaying items in grid mode. Default is 3, with selectable values of 3, 4, 5, or 6.
- Show Quick Notes: Determines how quick notes appear in your menu. Choose between Title Only (compact) or Title + 1-Line Preview (shows the title alongside a single-line preview of the note content).
Creating/Editing Menus
Menu List (Left Panel)
- Displays your existing menus by name (for example, the Default menu) along with their assigned activation shortcut (Key).
- + New: Click the + New button at the bottom-left corner to create a new custom menu.
- Quick Actions on the List:
- Reorder: Drag and drop menus to rearrange their priority order.
- Edit: Click a menu to view and configure its details in the right-hand panel.
- Delete Menu: Right-click a menu, or select it and click the Delete button (the Delete button appears when selecting any custom menu other than the Default menu). Note: The Default menu cannot be deleted. Deleting a menu only removes the menu itself; none of its included shortcuts, files, or notes are deleted.
Add Menu / Edit Menu (Right Panel)
(The panel header appears as Add Menu when clicking + New, or Edit Menu when modifying an existing menu.)
- Menu Name: Enter a recognizable name for your menu. This name also appears on the Menu Switcher bar if you have it enabled.
- Key: Assign a quick shortcut key (or select None). Because clicking the menu bar icon opens your Default menu by default, pressing this key while any menu is open immediately jumps to this specific menu without requiring mouse navigation.
- Automatically include new items: Check this option to automatically add any newly created items or shortcuts into this menu.
- Filter: Search and quickly locate specific items within the list.
- Included Items:
- Select or deselect items/groups to determine what appears in this menu.
- Commands: Includes actions such as Add a Quick Note, Preferences, and Quit. Note that Preferences and Quit are mandatory on the default menu and are disabled from editing to prevent locking yourself out of configurations. The notice Currently in Right-Click Menu indicates that an item has been relocated to the secondary right-click context menu (so it will not appear in the left-click menu); once returned to the left-click menu, it will automatically reappear in all selected menus.
- Categories: Includes Websites, Folders & Files, Applications, and Quick Notes. You can select an entire category, select items partially (indicated by a dash and count, such as
3/6), or click the arrow > to customize individual items within that group.
- Revert & Save:
- Revert: Click the undo arrow icon in the bottom-right corner to discard current changes and restore previous settings.
- Save: Click to apply and save all adjustments made to this menu.
Flexible Assignment: A single item (such as an application, bookmark, folder, or note) can be included across multiple menus simultaneously, giving you complete flexibility to organize your workspace however you like.
Note: Shortcut keys can be assigned from a to z. Once all available keys are in use, newly created menus can no longer be assigned a shortcut key.
Adding an Item
You can add shortcuts using any of the following three methods:
Method 1: Manually in Preferences
- Open Preferences... and click the tab for the target category (Websites, Folders & Files, Applications, or Quick Notes).
- Click New (or fill in the empty fields if "Add a..." is displayed).
- Enter a Title and the corresponding URL, Destination path, or Content.
- Select an icon or color. For Folders, Files, and Apps, Raw App Icon displays the exact native Finder icon in the menu bar.
- Click Save.
Method 2: Using the Share Extension
From Safari or any supported web browser, click the Share button and choose Add to Shortcuts in Menu Bar. In Finder, right-click any file, folder, or application and select Share > Add to Shortcuts in Menu Bar.
Method 3: Drag and Drop from Finder
Open Preferences..., choose either the Folders and Files or Applications category tab, and drag any file, folder, or app directly from Finder into the list pane.
Tips: Titles can be generated automatically. You usually don't need to enter them manually.
Tips: Add to Shortcuts in Menu Bar share extension works with web pages, applications, files, and folders.
Editing an Item
- Open the Preferences... window and navigate to the desired category tab.
- Select the item from the list (the header changes to Edit a...).
- Update the title, destination URL/path, or icon.
- Click Save.
Deleting an Item
To delete an item, open Preferences... and go to the relevant category tab:
- Using Context Menu: Right-click the item in the list and select Delete.
- Using the Delete Button: Click to select the item from the list, then click the Delete (trash) button below the list.
Tips: If you want the app to ask for confirmation before deleting, check Ask before deleting under the General tab in Preferences.
Create and View Quick Notes
Quick Notes let you jot down thoughts, code snippets, or memos right from your menu bar without opening a heavy text editor:
- Add a Note: Click Add a Quick Note in the menu. A clean popover opens where you can type your content. Notes save automatically as you write.
- View or Edit: Click any saved note in your menu bar to view or update its contents in the popover.
- Resize: Drag the edges or bottom-right handle of the note popover to adjust its dimensions to your liking.
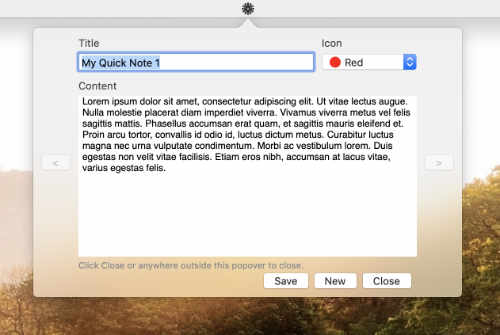
View, add, and edit notes instantly from the menu popover.
FAQ: I Don't See the "Add to Shortcuts in Menu Bar" Share Extension
If the share command does not show up in Safari or the Finder context menu, ensure it is activated in macOS settings:
On macOS Ventura, Sonoma, and Sequoia:
- Open System Settings from the Apple menu ().
- Go to Privacy & Security > Extensions.
- Click Sharing.
- Look for Add to Shortcuts in Menu Bar and switch the toggle to On.
On macOS Monterey or earlier:
- Open System Preferences > Extensions.
- Select Share Menu in the left pane.
- Check the box next to Add to Shortcuts in Menu Bar.
If the extension still does not appear, restart Finder (or restart your Mac) so macOS refreshes its registered extension plug-ins. For assistance, contact binhnt@binhnguyensoft.com.
Version History
macOS
2.5.1
- November 5, 2026- Some users asked for a way to group items to store more shortcuts. Deep submenus can be clumsy and time-consuming, so I took a cleaner approach: Multiple Menus. You can now create custom menus for different workflows and keep all your essentials on the top level—fast, tidy, and zero extra clicks.
- Enhanced iOS Synchronization: The cross-device sync mechanism has been overhauled for improved stability. Please note: To keep your data syncing correctly, you must update the app on both macOS and iOS.
- Bug fixes and UI improvements for a more refined experience.
Lite Version
- Increased the Quick Notes limit to 5, giving you more space for your notes.
2.3.2 Lite Version
- November 1, 2026- Fix an issue where the app may fail to launch on certain macOS versions. Special thanks to user a***@s***.net for the feedback and testing the patch.
- Preparing for iCloud Sync: Get ready to sync seamlessly across all your devices, including iPhone and iPad. You will soon be able to view, edit, and add websites and Quick Notes on the go. (Note: The iOS version will be available on the App Store soon. An update with the download link will follow once it's live.)
- Allow moving selected items to the right-click menu to save space.
- View and manage Google products cache.
- Optimize performance and stability.
- Fix minor bugs and refine the UI.
2.3.2 Full Version
- October 31, 2026- Fix an issue where the app may fail to launch on certain macOS versions. Special thanks to user a***@s***.net for the feedback and testing the patch.
- Minor bug fixes and UI improvements.
2.3.1 Full Version
- October 29, 2026- iCloud Sync Support: Sync across all your devices, including iPhone and iPad. You can now view, edit, and add websites and quick notes on the go.
- Allow moving selected items to the right-click menu to save space.
- View and manage Google products cache.
- Optimize performance and stability.
- Fix minor bugs and refine the UI.
2.2.2
- September 16, 2026- Updated for macOS 27 compatibility.
2.2.1
- May 13, 2026- Fix an issue where applications added via Preferences or drag-and-drop still prompt for access permissions.
- Prevent adding duplicate files, folders, or applications with the same path and notify the user if they already exist.
2.2.0
- May 12, 2026- Global Hotkey Support: Quickly open the app menu using a shortcut. The default is Command + Shift + ', and you can fully customize it in Preferences.
- Customizable UI: You can now adjust icon sizes and font settings in the Menu Bar for better visibility.
- Smart Web Icons: Added an option to automatically use the website's favicon as the icon for your web shortcuts.
2.1.0
- May 7, 2026- Re-add the "Add to Shortcuts in Menu Bar" share extension. You can add items from your browser or Finder by clicking Share > Add to Shortcuts in Menu Bar.
- Highlight text on a webpage in Safari, then click Share > Add to Shortcuts in Menu Bar to save that text directly into Notes.
2.0.0
- April 27, 2026- Rewrite the entire user interface using SwiftUI for a modern, sleek, and flexible experience.
- Reorder Google services to suit your preference.
- Performance optimizations and bug fixes.
1.2.6
- April 20, 2026For macOS 13.5 Ventura and above. Uses the updated macOS application directory structure.
- Add built-in access to popular Google services.
- Code optimizations and minor bug fixes.
1.2.5
- April 23, 2024- Update Support contact email address and website URL.
- Minor bug fixes.
1.2.4
- December 10, 2021- Raw App Icon is now default for Applications, Folders, and Files.
- Native Apple Silicon M1 support.
1.2.3
- November 7, 2020- Minor bug fixes.
1.2.2
- May 16, 2020- You can change the size of the Note Popover
- Minor bug fixes.
1.2.1
- August 3, 2019- When adding from Safari share extension, web page title will be the default text for Title.
- Minor bug fixes.
1.2.0
- July 29, 2019- Add the "Add to Shortcuts in Menu Bar" Share Extension, now you can add web pages, applications, folders or files by clicking Share > Add to Shortcuts in Menu Bar.
- You can change the font size of the Note PopOver from the Preferences window.
- Minor bug fixes.
1.1.0
- July 23, 2019- Popover notes will be automatically saved. You don't need to hit the Save button anymore. It would be more convenient for you.
- The menu item: Preferences... is moved to bottom, just before Quit.
- Bug fixes.
1.0.1
- July 4, 2019- First release on the Mac App Store.
iOS/iPadOS
1.1
- November 6, 2026- Updated in-app icons to match the macOS desktop version.
- Improved sync mechanism. Please update the macOS app to version 2.5.1 for seamless syncing.
- Minor bug fixes and performance improvements.
1.0
- November 2, 2026- First release on iOS and iPadOS.
Credits
Icons
Google Drive icon by Icons8
Google Calendar icon by Icons8
Google Maps icon by Icons8
Google product and service icons are retrieved directly from their respective official websites. All trademarks belong to Google.
Third-Party Libraries
SQLite.swift by stephencelis - Licensed under the MIT License.
KeyboardShortcuts by sindresorhus - Licensed under the MIT License.
For version 1.2.5 and below: MMWormhole by Conrad Stoll at Mutual Mobile - Licensed under the MIT License.